Bleaching a Skull
My buddy Scott was able to harvest his first pig this year, which was his first big game animal on his own.

He was also in the process of planning his upcoming wedding at the time and busy with finishing up requirements in school (he's a classmate of mine). To help him preserve the memory of the hunt I figured it would be nice to get the skull bleached out for him.
For those who haven't bleached out a skull here is a quick run down of the process. It is fairly easy but does take a day to be able to tend to it.
For the boiling it is best to get your camping stove or outdoor set up and a pot that is big enough to hold the skull you are working on. This is definitely a process you do NOT want to do inside.

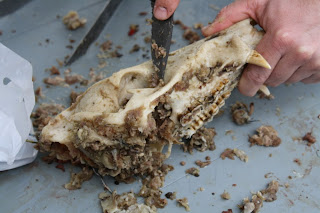
Remove as much of the skin and meat off of the skull prior to placing it in the pot. (Only on the dead animals). The more you can take off the quicker the process will go. On this skull I left too much meat on and it probably added an hour or two of boiling time.

Bring the water to a boil and place in to the pot for 15-30 minutes.


After the initial 15-30 minutes, take the skull out and remove any of the loose meat. Repeat this process every 15 minutes or so until the skull is completely void of any remaining muscle. Towards the end of the process it is helpful to use a garden hose to help flush out the brain cavity and nasal passage.
When all of the meat is gone you will have a few teeth that have fallen out or are loose. You will want to use a little bit of Super Glue on the inside of the teeth to help secure them into place. DO NOT use Gorilla Glue. I found this out the hard way on this project. The glue expands and comes out a dark brown which does not look good on a bleached skull!


I do not have any photos of the next step, but after letting the skull dry for a day you will want to place it in a pot or bucket with Hydrogen peroxide to complete the bleaching process. I found an easy way to do it is wrap it in paper towels and place it in a garbage sack before you apply the peroxide. What this does is allow the towels to soak up the peroxide and keep it on the skull and conserves on the amount of peroxide you will need. Once this sets for 24-48 hours, remove the contents and allow for it to dry.
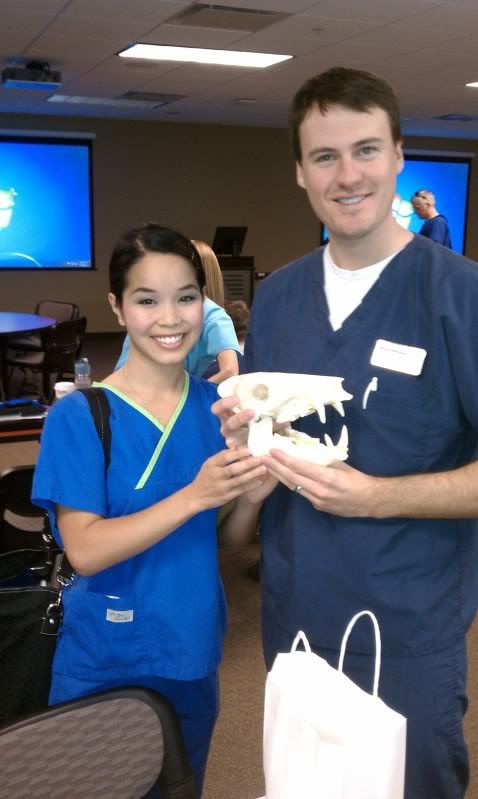
The finished product turns out to be a great wedding gift...maybe. But I gave it as the gift anyway!

The groom definitely liked it...and the bride at smiled for the camera. Probably not exactly what she was hoping for.
What can I say, I am on a dental school budget.

He was also in the process of planning his upcoming wedding at the time and busy with finishing up requirements in school (he's a classmate of mine). To help him preserve the memory of the hunt I figured it would be nice to get the skull bleached out for him.
For those who haven't bleached out a skull here is a quick run down of the process. It is fairly easy but does take a day to be able to tend to it.
For the boiling it is best to get your camping stove or outdoor set up and a pot that is big enough to hold the skull you are working on. This is definitely a process you do NOT want to do inside.

Remove as much of the skin and meat off of the skull prior to placing it in the pot. (Only on the dead animals). The more you can take off the quicker the process will go. On this skull I left too much meat on and it probably added an hour or two of boiling time.

Bring the water to a boil and place in to the pot for 15-30 minutes.

Get yourself a wire coat hanger or old BBQ tongs so you can get the skull in and out of the water

After the initial 15-30 minutes, take the skull out and remove any of the loose meat. Repeat this process every 15 minutes or so until the skull is completely void of any remaining muscle. Towards the end of the process it is helpful to use a garden hose to help flush out the brain cavity and nasal passage.

When all of the meat is gone you will have a few teeth that have fallen out or are loose. You will want to use a little bit of Super Glue on the inside of the teeth to help secure them into place. DO NOT use Gorilla Glue. I found this out the hard way on this project. The glue expands and comes out a dark brown which does not look good on a bleached skull!


I do not have any photos of the next step, but after letting the skull dry for a day you will want to place it in a pot or bucket with Hydrogen peroxide to complete the bleaching process. I found an easy way to do it is wrap it in paper towels and place it in a garbage sack before you apply the peroxide. What this does is allow the towels to soak up the peroxide and keep it on the skull and conserves on the amount of peroxide you will need. Once this sets for 24-48 hours, remove the contents and allow for it to dry.
The finished product turns out to be a great wedding gift...maybe. But I gave it as the gift anyway!
The groom definitely liked it...and the bride at smiled for the camera. Probably not exactly what she was hoping for.
What can I say, I am on a dental school budget.


Comments
Post a Comment